Building a Smarter Defense: Using ElastiFlow, Elasticsearch ML, and ExaBGP to Thwart DDoS Attacks
By: Eric Graham
September 18, 2024
In the ever-evolving landscape of network operations and cybersecurity, protecting your infrastructure from Distributed Denial of Service (DDoS) attacks is crucial. One effective method for mitigating these threats is using FlowSpec rules with ExaBGP. FlowSpec allows for various DDoS mitigation strategies, such as precise mitigation around specific ports and IP addresses (compared to RTBH), shaping traffic rather than outright blocking it, or leveraging your edge router to advertise routes to upstream transit providers using specific communities designed for mitigation.
This blog will explore the creation of a web service that receives a Webhook (in JSON format) containing IP and port details and writes this data to an exabgp.ini file to enable seamless FlowSpec integration with your router using BGP. Additionally, we'll touch on how ElastiFlow, combined with Elasticsearch's machine learning capabilities, can detect potential DDoS attacks and automatically trigger this Webhook for advertisement.
This blog is conceptual in nature. It provides an overview of the web service and ExaBGP integration without delving into step-by-step implementation details.
What is ExaBGP?
ExaBGP is a flexible and powerful BGP (Border Gateway Protocol) implementation. It allows for dynamic BGP message creation and manipulation, making it an ideal tool for managing FlowSpec rules, which are used to mitigate DDoS attacks by controlling traffic flow based on specified criteria.
FlowSpec: An Overview
FlowSpec (RFC 5575) is an extension to BGP that enables the distribution of traffic flow specification rules. These rules allow network administrators to define and enforce policies for handling specific types of traffic, such as dropping or rate-limiting traffic that matches a particular IP address or port range. This capability is crucial for mitigating DDoS attacks in real time.
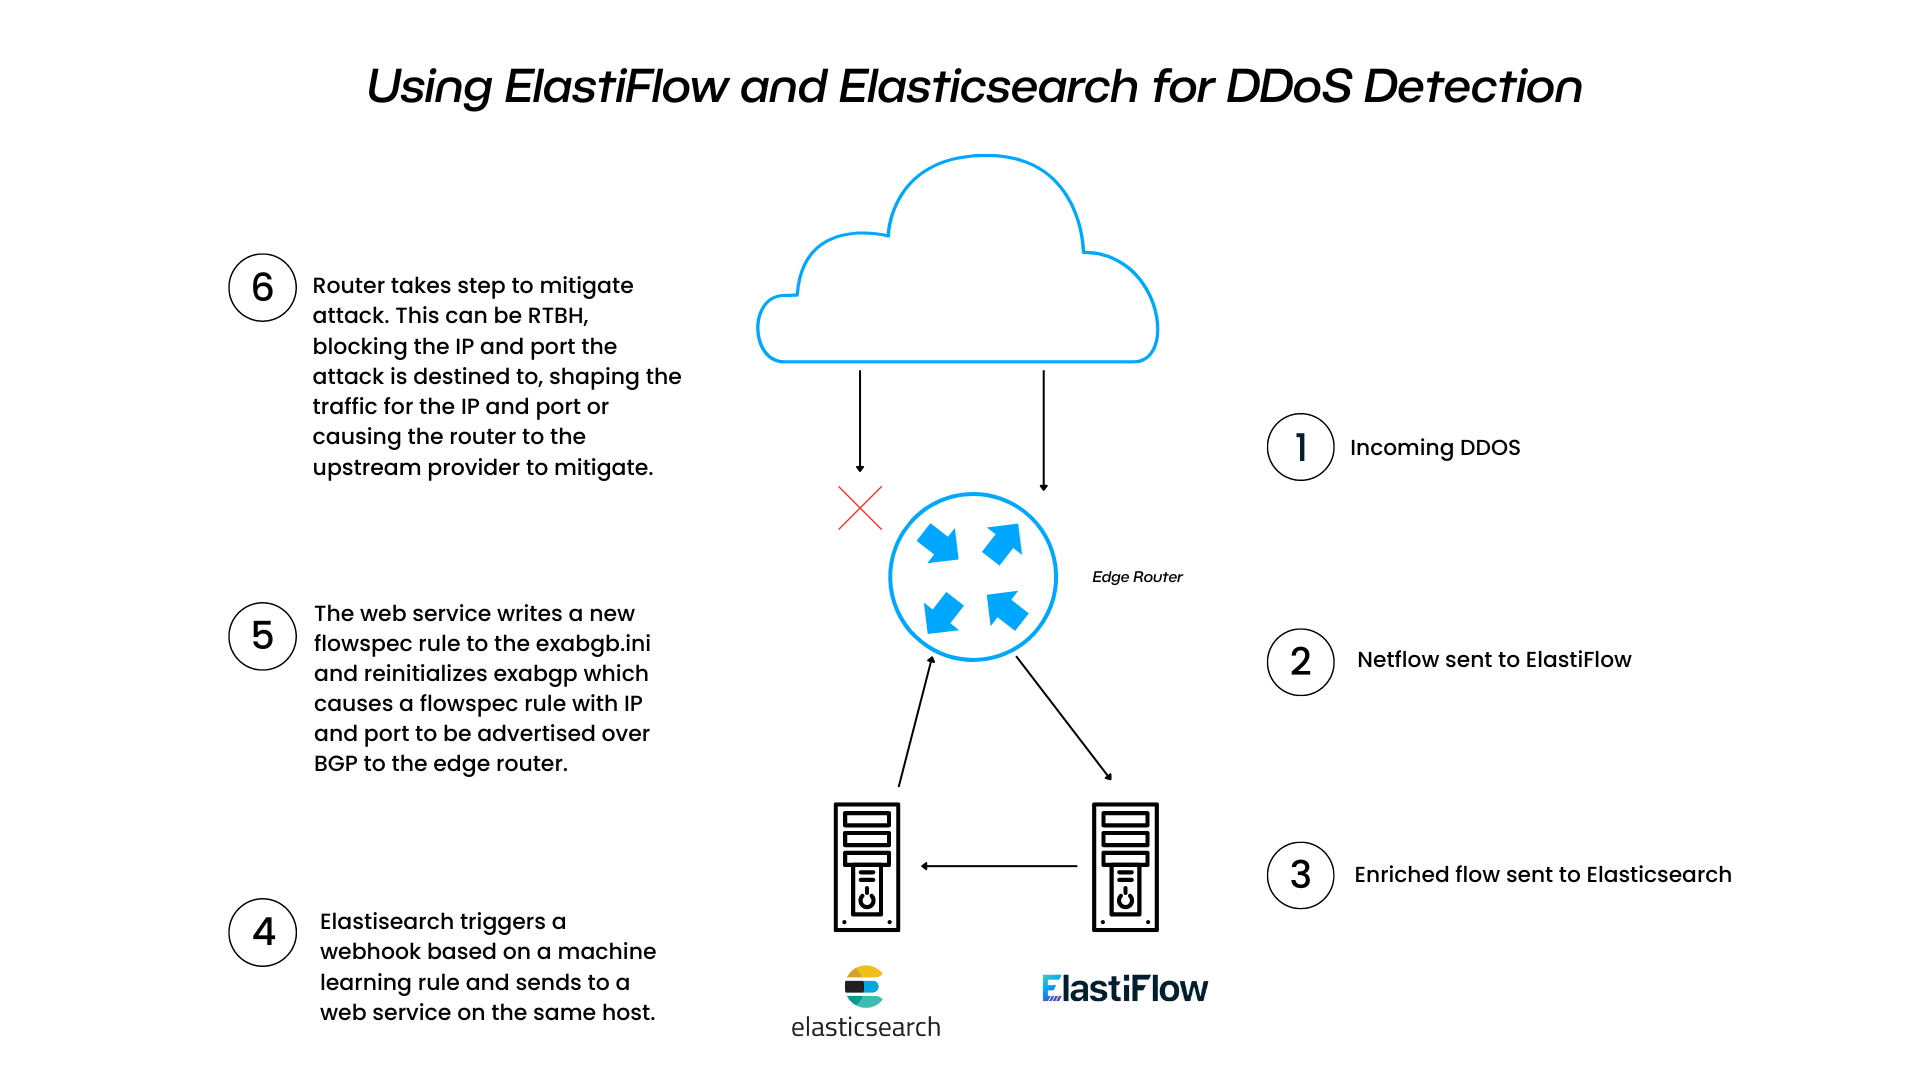
Using ElastiFlow and Elasticsearch for DDoS Detection
ElastiFlow is an analytics platform that processes network flow data (NetFlow, sFlow, IPFIX) and stores it in Elasticsearch. By leveraging Elasticsearch's machine learning capabilities, we can analyze this flow data to detect anomalous patterns indicative of DDoS attacks.
Once an attack is identified, Elasticsearch can generate a webhook that sends a JSON message to our web service. This message will contain the IP and port information necessary to create FlowSpec rules, which ExaBGP will then use to mitigate the attack.
Solution Diagram:

Building the Web Service
We'll build a web service using Python's Flask framework. This service will accept JSON messages containing IP and port information and then update the exabgp.ini file accordingly. Here's how to get started:
Prerequisites
Python 3.x
Flask
ExaBGP
Elasticsearch with machine learning capabilities
ElastiFlow
Step-by-Step Implementation
Step 1. Set Up Flask Web Service: First, install Flask if you haven't already:
1pip install Flask
Step 2. Create a file named app.py and start by setting up a basic Flask application:
1 2 3 4 5 6 7 8 9 10 11 12 13 14 15 16 17 18 19 20 21 22 23 24 25 26 27 28 29 30 31 32 33 34 35 36from flask import Flask, request, jsonify import os app = Flask(__name__) @app.route('/flowspec', methods=['POST']) def update_flowspec(): data = request.json ip = data.get('flow.src.ip.addr') port = data.get('flow.dst.l4.port.id') action = data.get('action', 'discard') if not ip or not port: return jsonify({'error': 'IP and port are required'}), 400 config_entry = generate_flowspec_route(ip, port, action) append_route_to_exabgp_config(config_entry) return jsonify({'status': 'success'}), 200 def generate_flowspec_route(ip, port, action): # This function generates only the route section and adds closing braces for flow and neighbor blocks config = f""" route {{ match {{ source {ip}/32; port {port}; }} then {{ {action}; }} }} }} }} """ return config def append_route_to_exabgp_config(entry): # Append only the route section and close the flow and neighbor blocks with open('/etc/exabgp/exabgp.ini', 'a') as config_file: config_file.write(entry) if __name__ == '__main__': app.run(host='0.0.0.0', port=5000)
Step 3. Configure ExaBGP: Ensure ExaBGP is installed and configured on your system. The configuration file /etc/exabgp/exabgp.ini should include a section for handling FlowSpec rules. Here’s a basic example that includes BGP peer information:
1 2 3 4 5 6 7 8 9process announce-routes { run /usr/bin/exabgp --env /etc/exabgp/exabgp.env } neighbor 10.0.0.1 { router-id 10.0.0.2; local-address 10.0.0.2; peer-as 65001; local-as 65000; flow {
Step 4. Integrate with Elasticsearch: Set up ElastiFlow to process network flow data and send it to Elasticsearch. Then, an Elasticsearch machine learning job will be configured to analyze this data for DDoS attack patterns. When an attack is detected, Elasticsearch should be configured to trigger a webhook to our web service.
ElastiFlow Machine Learning rules:
ElastiFlow provides over 120 machine-learning rules that can be used in Elasticsearch and Kibana to get you started on your NetSec and DDOS identification journey. ML rules can be downloaded from the following URL.
https://docs.elastiflow.com/docs/data_platforms/elastic/ml/
To load Machine Learning rules in Kibana, go to “Stack Management” (Under Alerts and Insights), choose “Machine Learning,” and select “Import”. Choose the file you downloaded from the URL above. This will require an Elasticsearch trial license.
Machine Learning rules are now accessible from (Analytics) “Machine Learning,” “Jobs.”
You can use the existing JSON from one of the provided ML rules to create a new DDOS attack identification rule that creates the desired output.
Example of configuring webhook output in Elasticsearch:
1 2 3 4 5 6 7 8 9 10 11 12 13 14 15 16 17 18 19[{{rule.name}}] Elastic Stack Machine Learning Alert: - Job IDs: {{context.jobIds}} - Time: {{context.timestampIso8601}} - Anomaly score: {{context.score}} {{context.message}} {{#context.topInfluencers.length}} Top influencers: {{#context.topInfluencers}} {{influencer_field_name}} = {{influencer_field_value}} [{{score}}] {{/context.topInfluencers}} {{/context.topInfluencers.length}} {{#context.topRecords.length}} Top records: {{#context.topRecords}} {{function}}({{field_name}}) {{by_field_value}}{{over_field_value}}{{partition_field_value}} [{{score}}]. Typical: {{typical}}, Actual: {{actual}} {{/context.topRecords}} {{/context.topRecords.length}} {{! Replace kibanaBaseUrl if not configured in Kibana }} [Open in Anomaly Explorer]({{{kibanaBaseUrl}}}{{{context.anomalyExplorerUrl}}})
1Will generate
1 2 3 4 5 6 7 8 9 10 11[webhook] Elastic Stack Machine Learning Alert: - Job IDs: elastiflow_ecs_netsec_bruteforce_direct_cli_priv_fast - Time: 2024-02-06T17:30:00.000Z - Anomaly score: 79 Alerts are raised based on real-time scores. Remember that scores may be adjusted over time as data continues to be analyzed. Top influencers: flow.src.ip.addr = 192.168.5.2 flow.dst.l4.port.id = 22 Top records: high_distinct_count(client.port) 192.168.4.57ssh (TCP/22) [69]. Typical: 41.464, Actual: 604 [Open in Anomaly Explorer](http://elastiflow-ek.eastus.cloudapp.azure.com//app/ml/explorer/?_g=(ml%3A(jobIds%3A!(elastiflow_ecs_netsec_bruteforce_direct_cli_priv_fast))%2Ctime%3A(from%3A'2024-02-06T15%3A50%3A00.000Z'%2Cmode%3Aabsolute%2Cto%3A'2024-02-06T19%3A10%3A00.000Z'))&_a=(explorer%3A(mlExplorerFilter%3A()%2CmlExplorerSwimlane%3A())))
Step 5. Deploy the Web Service: Deploy the Flask web service on your server. You can use a WSGI server like Gunicorn for production deployment:
1 2 3pip install gunicorn gunicorn -w 4 app:app
Step 6. Testing the Service: Test the web service by sending a POST request with JSON data. You can use a tool like Curl or Postman:
1sudo curl -X POST -H "Content-Type: application/json" -d '{"flow.src.ip.addr": "192.168.1.100", "flow.dst.l4.port.id": "80", "action": "discard"}' http://localhost:8000/flowspec
Step 7. Check your exabgp.ini and ensure a new flow and route have been added.
1 2 3 4 5 6 7 8 9 10 11 12 13 14 15 16 17 18 19 20 21user@development-elasticsearch:~$ cat /etc/exabgp/exabgp.ini process announce-routes { run /usr/bin/exabgp --env /etc/exabgp/exabgp.env } neighbor 10.0.0.1 { router-id 10.0.0.2; local-address 10.0.0.2; peer-as 65001; local-as 65000; flow { route { match { source 192.168.1.100/32; port 80; } then { discard; } } } }
By using ElastiFlow and Elasticsearch to analyze network flow data and automatically trigger FlowSpec rule creation through ExaBGP, you can create a robust and automated defense mechanism against DDoS attacks. Remember, the key to effective DDoS mitigation is the tools you use and how you integrate and automate them within your infrastructure. You're taking a significant step toward robust network security by leveraging ExaBGP, FlowSpec, ElastiFlow, and Elasticsearch.
Please stay tuned for additional DDOS identification and mitigation blogs coming soon!
Stay connected
Sign up to stay connected and receive the latest content and updates from us!